background

Tuesday, April 24, 2012

Pillowcase Nightgown


I used the pillowcase nightgown tutorial from Gingercake as posted on the Prudent Baby website. I'd had my eye on this tutorial for sometime and finally got around to picking up a pillowcase from Value Village to test it out on. I am really pleased with the end product, but had some hang-ups along the way. The flutter sleeves were just a trial and error process that ended up working out okay, but the shape of the sleeve was difficult for me to figure out how to attach. Once the nightgown was put together, the last thing I attempted to do was a rolled hem along the neckline - this was a major fail. The curved line made it very difficult to get it to roll properly. So I picked up some double-fold bias tape and used extra long ends for a tie in the back. What a wonderful invention the bias tape is - it made the finishing so much easier and I like the added bit of blue. Brynn is thrilled with it, she loves that it is so long. It will be nice on our warm summer nights, which we've already had a taste of!


She was not being cooperative for the photo shoot - so this is as good as it gets.

Sunday, April 22, 2012

Flop to Top


I had some leftover material from making Brynn's birthday skirt, so I thought I'd try to piece together a summer dress for Parker. I bought a bit of coordinating green material for the bodice and used a pattern to make it. According to her measurements, I needed to make it a large. After cutting and sewing the bodice together, I taught myself to gather using this technique. It was really simple. I really enjoyed putting this dress together, but even prior to trying it on Parker, it was clearly too large.
 

It make a really cute top for Brynn!

Tuesday, April 3, 2012

Parkers Pinafore


This pattern was one that I've had my eye on since before learning to sew. I used the extra material that I had from Brynn's dress. I love this top. As the tutorial states, it was a pattern written for ages 6-12 months, but it would fit for longer. Parker is 16 months old and it's a perfect tunic rather than dress. I think she'll be able to wear it throughout the summer months. I'll definitely make a couple more for her, I really enjoyed the process and the outcome!


To make your own, check out the Smashed Peas and Carrots website.


Monday, April 2, 2012

Sewing from a Pattern

I did it! I finished a "real" sewing project. Although there were some uncertainties and "fudging" along the way, I'm pretty pleased with my end product. Brynn loves the lady bug buttons and trim. She wore the dress all morning even though it is not nearly warm enough to go without sleeves nor leggings or tights. I began this project on Saturday afternoon during Parker's nap time. During that hour or so, I placed and cut the pattern onto my fabric. Oh, by the way, the main fabric (blue and white stripes) was bought at Value Village for only $1.99 = score! I even have enough left over to do something for Parker if I want. I began the sewing last night after the girls were in bed, around 8:30 and finished the buttonholes right before midnight - thank goodness for Spring Break! The steps that were challenging for me included: lining up the pattern pieces where the notches were cut - it was close for most of them, but none were perfectly in line; I didn't have interfacing, so I just used more fabric and had no idea how to sew the side seams of the interfacing together (I fudged and just folded them over and tacked them down rather than sewing - I'll have to figure this out, though); making buttonholes; and sewing on the buttons. I'm proud to say that looking at the finished dress, when it's on Brynn, you cannot tell that these things gave me any problems! The one thing that bugs me a bit is seeing where the interfacing stops - I wish that I would have lined the whole dress. Nevertheless, it is really fun to see Brynn wearing and loving something that I MADE! I'm excited to try more patterns now that I have my fist one finished; I hope to employ some of the things that I learned and hope that they give me less trouble.


Wednesday, March 21, 2012

A Summer Skirt in The Early Spring

When we were at the fabric store last, I let Brynn look through material to choose a print for another simple skirt like the one I made her for her birthday. She chose a green, watermelon print. Every day since we had the fabric at home she'd ask "Mom, can I help you make my watermelon skirt today." After about a week of putting her off, I decided to go for it. We were able to make the skirt together in about 30 minutes, and it wasn't even Parker's nap time! I did all of the sewing, but Brynn helped snip the threads, stood for measurements and pulled out the pins as we went along. She seems to really enjoy watching me learn to sew and tries to get her hands in as often as I'll allow her. So, we finished the skirt yesterday afternoon and when I came home from work today she was wearing it! It makes me happy to know that she has been looking forward to having it made for her and now is loving to wear it. Although it is rainy, gray and cold out; she loved wearing her watermelon skirt today. So, we'll just ignore the sweater tights and long-sleeved, ill-matching top and instead celebrate a successful sewing experience! Now we'll just have to shop for a cute spring/summer top to go with it!


Crib and Lap Blanket


I've been wanting to make Parker a crib blanket for a while now, so when JoAnn's had a huge sale on flannel fabric I took advantage of it. With Parker's eczema, it's recommended that we clothe her and cover her in all cotton, especially when sleeping, to help her skin breathe and to keep her from over-heating. I saw the idea of using flannel strips as an easy way to make a baby blanket on the Sumo's Sweet Stuff website. I wanted to make the blanket large enough that Parker may be able to use it over the years as a light-weight lap blanket, too. I chose colors and prints that I thought she could enjoy over the years. After washing and ironing the material, I cut them into 5 inch strips. I lined them up evenly on one side and sewed each strip together with the wrong sides facing each other to allow for the seam to stand up on the right side when laying flat. Once all of my strips were sewn together I had to even up the edges and overall dimensions of the blanket. I then sewed the front and back panels together. At this stage, the blanket looked like this:


Now the time consuming part begins. I used scissors to snip into each of the seams every 1/4 inch. This would allow them to fray and create a fringe once washed and dried. This took me a couple of nights of TV watching to finish. I had to take occasional breaks because of an achy hand. Once I had all of the seams snipped, I tossed the blanket into the wash. I think with each additional wash and dry the fringe will get better and better. I am really happy with the way that this turned out. I decided not to bother with quilting any of it together, I don't think it'll shift around too much to matter, nor will Parker even notice nor care if it does.


Owls

I've recently been saving our toilet paper rolls, knowing that there are a lot of great kids' crafts out there that can use them. Brynn and I recently used an afternoon to make a whole family of owls. First she decided on the sizes of owls that she wanted: 2 adults, 3 kids and 3 babies - talk about a large family! Then it was time to paint them.


We let the paint dry for about 30 minutes then came back to form the feathers on top and stick on the googley eyes.


Brynn's favorite part was the next couple of steps because she got to use scissors to cut and glue to stick on the beaks and wings. She did all of the cutting herself and continually squeezed out gobs of glue. The owls now reside on her bedroom windowsill; they occasionally hoot the night away.


I got this project idea from the Natural Kids website.

Friday, February 17, 2012

A Birthday Skirt


What better than a birthday occasion to craft my first skirt. Since I am still very much a novice seamstress, I used the Made tutorial for "a simple skirt." It truly was a simple pattern. I'll definitely be making more of them. I had my eye on this fabric print for the curtains in Brynn's bedroom, but I figured she'd prefer more blue in the print for those. So, when I wanted to attempt a skirt for her birthday photos, I knew this hummingbird/floral print would be just right. Brynn's favorite part of the print are the little blue birds. I love it. I had to rip out the bottom hem and do it over because my needle must have been a bit dull and caused some puckering on the first try. Overall, this little skirt is exactly what I had pictured. I think I may officially have the sewing bug in my system!


Monday, February 13, 2012

Repurposed T-shirt Skirt

I used an old HHS t-shirt to make a Valentine's Day skirt for Brynn. What a fun, quick and super easy way to craft a skirt. It also felt pretty good to be able to use supplies from home without having to put out any money. I got the idea from the blog Somewhat Simple. I'll definitely use this technique again - maybe as a way to practice my free-hand embroidery that I have yet to learn. The best part of this project was being able to use my new cutting mat. My mom is letting me borrow her rotary cutter, so I used a JoAnn's coupon to get a mat - I love it, what a genius tool. Now I just need to wait for another coupon to buy one of the clear ruler-type things (I have no idea what the technical term is) to make it even easier. So, I first cut the t-shirt to about 14 inches in length, keeping in tact the bottom hem of the shirt.

I knew that the writing would not show because of folding it over to make the waist band. The other good part about using a t-shirt is that you don't really need to finish the edges because the jersey material will not fray! So, after pinning the waist band, I sewed it and threaded the elastic through, finishing the skirt.

I then used scrap felt to cut out the letters in "love." I embroidered them onto the hemline of the skirt. This entire project only took about 45 minutes - including the time to hand sew the letters onto the skirt.


The best part is that Brynn loves it. Hopefully she'll wear it to school tomorrow for Valentine's Day! Either way it is a success!


Tuesday, January 17, 2012

Crayon Hearts


We've got some cabin fever going on here with about 7 inches of snow and more expected in the forecast. So, I looked online for a fun Valentine type craft that Brynn and I could do together while Parker napped. I found these great 
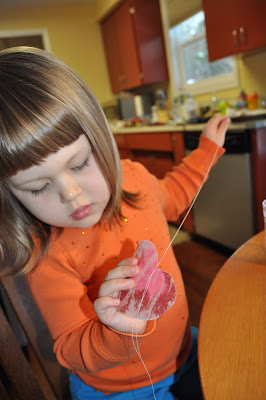
Crayon Hearts on Pinterest. It took longer than I anticipated to cut and attach strings to the hearts, but the overall project was completed in about 2 hours. Brynn was able to participate in most steps; I did the shape tracing and cutting, knot tying in the thread and hanging them up. Brynn loved using the scissors to cut and the needle to pierce the hearts.

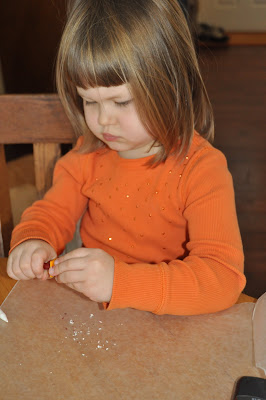
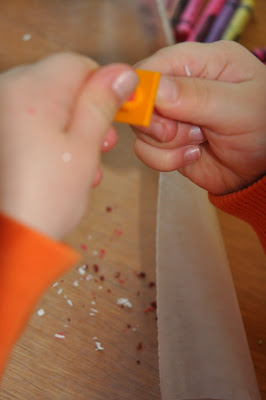
The first step was to shave or sharpen crayons onto half of the amount of wax paper.
After the desired amount of crayon shavings were on the wax paper, you fold the clean half on top of the shavings and secure by folding the edges. We then placed a cloth napkin both under and on top of the wax paper prior to ironing it. The heat from the iron melts the shavings.
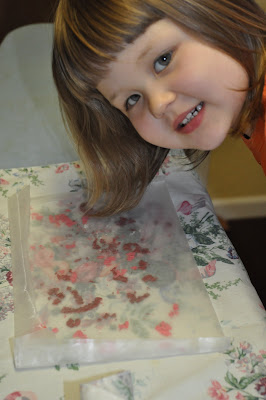
Once the wax cools, you then trace your shapes and cut them out. We then attached a thread to the hearts for hanging.
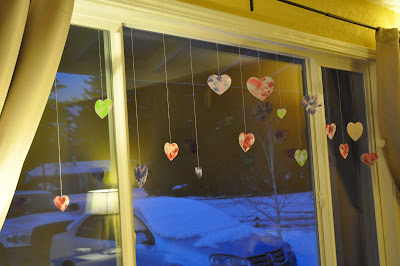
The picture at the top of this entry is of the original way that we hung them, but once our heat kicked on it blew the hearts and tangled them all together. So we decided to spread them out, thus looking like this:
It's not quite as I envisioned when starting out, but we made it our own with some green, pink and purple hearts. The best part is that Brynn feels good having creating some awesome window art to last us through Valentine's Day.
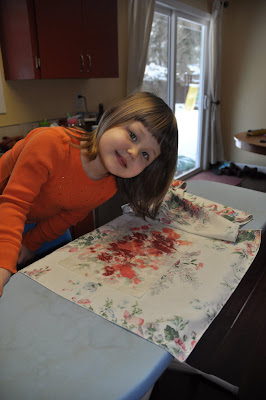


Monday, January 16, 2012

Book Sling


As recommended by my friend, Mo, I used my novice sewing skills to make a book sling for Parker's room. Parker's room doesn't have adequate space for a bookshelf, but we are swimming in books at this house. The sling gives us a cute, practical space for storing books! I tried to coordinate fabric colors with her curtains, but honestly I wish I had chosen something different. I love the way the sling turned out, but I'm not crazy about the stripes - a bit more whimsy would have suited my taste better. Now that I have the dowels and brackets, I figure that making another sling as Parker grows older, and has an opinion on her decor, will be fairly simple. I am even thinking that Brynn may need one of these above her bed since she has no headboard. Her most favorite books could be tucked inside to avoid loosing them in the midst of the other chaos on the shelf, under the bed or among the toys. Overall, I enjoyed making this project and may have to whip up a few more for around the house! If you'd like to make one for yourself, you can find the tutorial at Penny Carnival's website.


Tuesday, January 10, 2012

What draft?

So, the picture above is what our kitchen floor has looked like all winter long. Our garage is behind that door and the temperature is drastically different between the two spaces. Our door has a small gap at the bottom that allows the cold air to come in, so I used my newly learned sewing skills to make a draft stopper. I took advantage of the great sale and teacher appreciation weekend at JoAnn Fabrics and bought 1/3 yard of upholstery fabric. After washing and trimming the edges, I sewed the two long sides together, pressed the seam flat and then turned the tube right-side out. I then folded in one side about 2 inches and sewed the opening shut. I used kitty litter as the filler then finished off the other end. I am happy with the way it turned out - the only bummer is that the kitty litter has a strong floral smell, which I'm not loving. Hopefully with time the odor will fade and not be noticeable. This project was finished in no time, which made it even more fun for me.

Next in the sewing world is practicing a zig-zag stitch since I do not have a surger. I found some simple skirts that I'd like to make for Brynn's birthday.

Ribbit, Ribbit


I had some leftover fabric from making Brynn's curtains, so I decided to make a little softie to practice my sewing skills. I had these little critters cut and sewed together a couple of weeks before Christmas, but never got around to filling them and stitching them up until the other day. I downloaded the pattern and instructions from the Purl Bee tutorial: The Purl Frog. I opted to not add beaded eyes because of Parker Mei's obsession with putting everything in her mouth right now. I used lentils to fill the frogs and did my best attempt at hand-stitching them together. Hopefully they'll stay together well; one of them is being given to a friend of ours who just brought home a new baby sister.